Target Alignment via Alignment Stick
Using the Alignment Stick
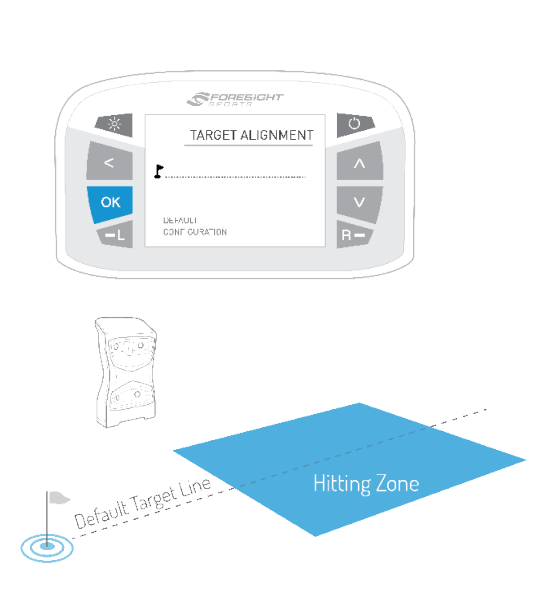
To setup the device to use the alignment stick you will need to go to your LCD Menu on the device by pressing the OK button. Once you have opened the menu, navigate down to the Target Alignment option and press the OK button once more.
The Target Alignment screen shows the current alignment configuration of the device.
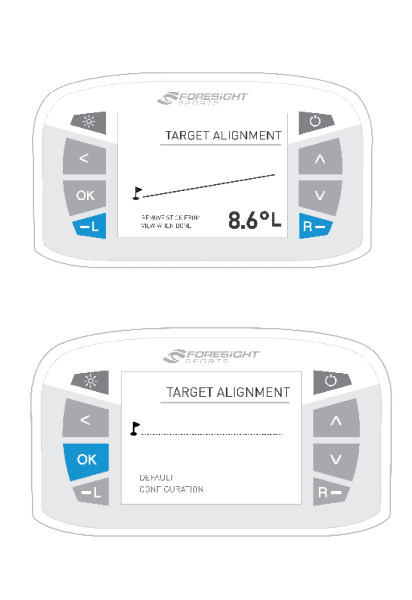
If alignment has been adjusted via the FSS Alignment Stick, the new alignment angle will be shown on screen.
To reset alignment to factory default, press the OK key.
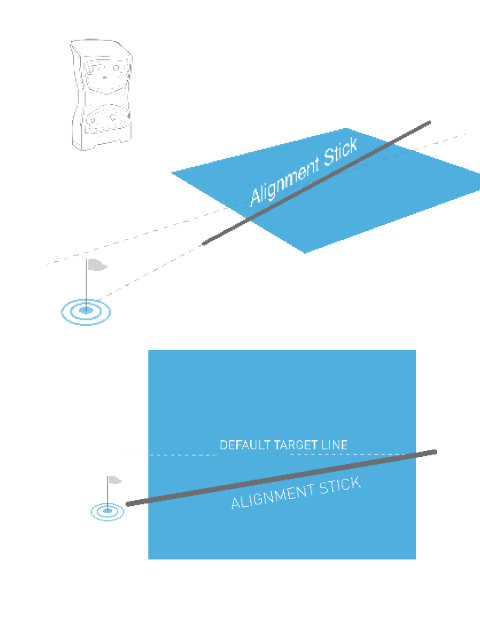
Target alignment can be adjusted up to 10 degrees on the GCQuad via the FSS Alignment Stick.
To adjust alignment, place the FSS Alignment Stick in the GCQuad hitting zone and align to your target.
Once aligned, step away from the device to allow for it to calibrate.
After a few seconds, both LED indicators will show yellow and the unit will give an audible tone.
The new alignment angle will be shown on the LCD screen.
Alignment can be viewed and reset at any time from the Target Alignment menu in System Options.
To reset alignment to factory default in this screen, press the OK key.
Alignment is always reset when the unit is powered off.
Notes For Indoor Use
Most often customers do not need the alignment stick and are just going to hit straight ahead towards the screen or net due to the way the Room Configuration Tool places the driving range target line/flag directly in front of the golf ball.
The only time customers would use the alignment stick indoors is if they were trying to change the location where the impact was occurring on the projection screen, but this can get tricky if the Room Configuration Tool is not adjusted accordingly.
Related Articles
Launch Pro Target Alignment Using The Alignment Stick
This covers how to use the Launch Pro’s Target Alignment feature with the alignment stick to set the device’s aim relative to a chosen target line. It also explains how alignment angles are displayed, adjusted, or reset, and when using the alignment ...GCQuad & QuadMax: Enable APIPA via HDT
This article explains how to enable APIPA (Automatic Private IP Addressing) on a GCQuad or QuadMax using the Hardware Diagnostic Tool (HDT). APIPA is commonly used when troubleshooting direct Ethernet connections between the device and a PC, ...Accessing The Room Configuration Tool - Adjusting Target Line In Software
In order to adjust the target line (aim line or center line) within your software you must access the Room Configuration Tool. This is a application, separate from the Simulation Software. To do this please see the steps below: 1. Open your WINDOWS ...Launch Pro User Manual
Welcome to Launch Pro Accuracy Above All Your pursuit of longer drives, more accurate carries and lower scores requires knowing the critical data points of your swing. A personal launch monitor will give you these data points, however, not all launch ...Launch Pro Getting Started
The Launch Pro “Getting Started” guide walks you through what comes in the box and how to set up, charge, and power on your device for the first time. It also references where to scan the QR code to download the Foresight app, register your Launch ...